Showing posts with label Appetizers and Dips. Show all posts

Sunday, March 3, 2013

Bacon-Jalapeno Cheese Ball

This year my husband and I hosted the Superbowl party at our house.  Of course I wanted to try a bunch of new recipes for the event.  Unfortunately, some of them didn't turn out all that great and I won't be making them again but this cheeseball was delicious.  Because the jalapenos have been cored and seeded, there is almost no heat.  It was great and everyone loved it but next time I think I'll leave a few seeds; I like a little heat.

Bacon-Jalapeno Cheeseball

  • 6 slices of bacon, cooked - I recommend you bake it
  • 1/4c pecans, chopped
  • 8oz cream cheese, at room temperature
  • 1/2c shredded cheddar cheese
  • 2T chopped parsley
  • 1 clove garlic, minced
  • 1/4t ground cumin
  • pinch of cayenne pepper
  • 1t lime juice
  • 1/2t Worchestershire sauce (I ran out of this so I substituted Soy Sauce.  Worked great)
  • 2 jalapenos (ribs and seeds removed), finely chopped and divided
  • crackers (for serving)
Cook the bacon in the oven until crispy.  Transfer to a paper towel-lined plate.  Allow to cool, then crumble and divide in half.

After the bacon is done cooking, preheat the oven to 350'F.  Spread the pecans on a baking sheet and toast for 5-7 minutes, or until fragrant.

In a medium bowl, stir together the cream cheese, cheddar cheese, parsley, garlic, cumin, cayenne, lime juice, Worchestershire sauce, half of the minced jalapenos, and half of the crumbled bacon until well combined.  Season the mixture to taste with salt.


On a large plate, stir the toasted pecans, remaining minced jalapenos and remaining half of the bacon together until evenly distributed.  Shape the cream cheese mixture into a ball (the mixture will be sticky.  I found it was easier to shape if I just barely wet my hands first).  Roll the ball in the pecan mixture until coated on all sides.

Cover the ball and refrigerate for at least and hour before serving.


Sunday, February 3, 2013

Cheesy Jalapeno Popper Baked Stuffed Chicken


The first time I ever tasted a Jalapeno Popper was back when I was in college.  We had just finished an orchestra performance and as per tradition, headed over to Applebee's for a late dinner/celebration.  One of the performers worked at Applebee's and told us that they had this great appetizer that wasn't even on the menu.  He talked the cook into making some for us to try, and I've been addicted ever since.  

So, of course the idea of pairing Jalapeno Poppers with any main dish sounds awesome to me, but these little chicken rolls really were awesome.  And I love that I can eat them and not feel guilty because they are relatively low fat and low calorie.  

 Servings: 4    Serving Size: 2 stuffed breasts    Calories: 371
Fat:  17.5g    Protein: 42.7g    Carbs:  11g    Fiber:  1.5g
Sugar:  0.6g     Sodium: 355.8mg (without salt)


  • 2 slices center cut bacon, cooked and crumbled
  • 3 jalapenos, chopped (remove seeds for milder flavor)
  • 3oz "1/3 less fat" cream cheese, softened
  • 4oz reduced fat shredded cheedar jack cheese
  • 2T chopped scallions
  • 8 thin sliced chicken breast cutlets, 3oz each
  • 1/2c Italian seasoned whole wheat breadcrumbs
  • 1 1/2 juicy limes, juice of
  • 1T olive oil
  • salt and pepper
  • olive oil non-stick cooking spray
Season chicken with salt and pepper.   Preheat oven to 450'.  Lightly spray a baking dish wiht non-stick spray.

Combine cream cheese, cheddar, scallions, jalapenos and bacon crumbles in a medium bowl.


Lay the chicken cutlets on a working surface and spread 2T of the cream cheese mixture on each cutlet.  Loosely roll each one, secure the ends with toothpicks to prevent the cheese from oozing out.

Place breadcrumbs in a bowl.

In a second bowl, combine the olive oil, lime juice, salt and pepper.


Dip the chicken in the lime-oil mixture, then in the breadcrumbs and place seam side down on a baking dish. Repeat with the remaining chicken.  When finished, lightly spray the top of the chicken with oil spray.


Bake for 22-25 minutes.  Serve immediately


On a side note, this filling also tastes wonderful as a cracker dip.  Yum!


Sunday, June 17, 2012

Baked Mozzarella Sticks


So I LOVE Mozzarella Sticks but I don't love the fat.  These sticks are great because they are baked & you can use low-fat cheese to make them even healthier.  Pair them with my Quick & Easy Marinara Sauce & you've got the perfect snack for any party.  You can even freeze them in large batches for future use.  


Baked Mozzarella Sticks
Servings: 12  Serving Size: 2 pieces  Calories: 86.8  Fat: 4.8g
Protein: 7.4g  Carbs: 3.5g  Fiber: 0.2g  Sugar: 0.2g   Sodium: 168.6  


  • 12 sticks part-skim, reduced sodium mozzarella string cheese (Sargento)
  • 1 large egg, beaten
  • 2T flour
  • 5T Italian seasoned breadcrumbs
  • 5T Panko crumbs
  • 2t parmesan cheese
  • 1T dried parsley
  • olive oil cooking spray 
    Cut cheese in half to give you 24 pieces.  Place the cheese in the freezer until cheese is frozen.

    In a small bowl, whisk the egg.  Place the flour on another small dish.  In a separate bowl, combine bread crumbs, panko, parmesan cheese & dried parsley.

    Dip the frozen sticks in the flour, shaking off the excess, then into the egg, then coat with the crumbs.

    Repeat this process with the remaining cheese placing them on a tray with wax paper.  Place the cheese back into the freezer until ready to bake (this is a must or they will melt before the crumbs get golden).

     When ready to bake, preheat the oven to 400'F.  Line a baking sheet with aluminum foil & lightly spray with oil.

    Place frozen cheese sticks on the baking sheet.  Spray the tops of the mozzarella sticks with a little more oil and bake in the bottom 3rd of your oven until crisp, about 4-5 minutes.  Turn and bake and additional 4-5 minutes, watching then closely so they don't melt.

Makes 24 pieces


Saturday, November 19, 2011

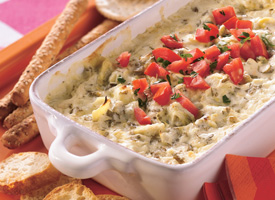
Artichoke Dip with Fresh Herbs

I love warm Spinach & Artichoke dip but unfortunately even a little spinach will trigger a nasty migraine.  So I rarely get to eat the dip I love.  Then I found this recipe.  It tastes just like Spinach & Artichoke dip but without the spinach.  You can make this with dried herbs but why?  Food tastes so much better using the fresh stuff.  Trust me, once you try it, you'll never go back to the dried bottled stuff.


Artichoke Dip with Fresh Herbs

Dip
  • 1c light sour cream
  • 1/2c light mayo or salad dressing
  • 1/2c grated Parmesan cheese
  • 1/4c chopped fresh parsley
  • 2T chopped fresh or 1/2t dried thyme leaves
  • 2 medium green onions, slices (2T)
  • 1 can (14oz) artichoke hearts in water, drained, coarsely chopped
  • 1/2c diced seeded plum (Roma)  tomatoes

Dippers
  • French bread slices or crackers for dipping

Heat oven to 350'.  In a medium bowl, mix all dip ingredients except tomatoes.  Spread in an ungreased 9" glass pie plate or shallow 1qt casserole.

Bake 18-24 mins or until hot.  Top with tomatoes and additional chopped fresh parsley.  Serve warm with dippers.  Cover and refrigerate any remaining dip.

***Can be made the night before***


Sunday, November 6, 2011

Restaurant Style Salsa

I LOVE the salsa that they serve at restaurants.  You know the kind, NOT CHUNKY.  I wish that I could find it at the grocery store but all I've been able to find was chunky.  So now I've found a recipe that is so easy to make & it's extremely good & the best part is ...  It's not chunky!


Restaurant Style Salsa

  • 1 can whole tomatoes (I think it's a 28oz can.  Its the next size up from the 14oz can).
  • 2 14oz cans Rotel diced tomatoes with green chilies (1 original & 1 mild flavored)
  • 1/4c onion, diced
  • 1 garlic clove, smashed & chopped
  • 1 jalapeno, chopped.  Use the whole thing, seeds pulp & all
  • 1/4t sugar
  • 1/4t salt
  • 1/4t cumin
  • juice of 1 small lime or 1/2 of a large lime
  • 1/2c to 1c cilantro.  This'll add a lot of flavor so I like to use a lot

Put all ingredients into a food processor & pulse until you get your desired consistency.  Don't just let the processor run or you'll turn your salsa into soup.

Allow it to refrigerate for at least a couple hours so that the flavors can marry.

Dish it up & enjoy